Saturday, October 27, 2012

Vintage Slides Lampshade

This is a project that I was really excited about while Chris was skeptical. Although when I was making this he kept saying "I love lamp" which I guess is a quote from a movie. When I was finished I was thinking I love THIS lamp. It melds our vintage and industrial styles together, I think, and is so unique.

You need: A small desk lamp (I got this one at Walmart for $12), vintage slides (which I bought 50 of on Etsy for $5 plus shipping)


You don't have to use a store bought lamp like this. My first attempt included finding a cool lamp base and an old lamp shade, but buying a small lamp worked out much better. 

So, first, remove the lamp shade and cut of the fabric.  


All you need are the top and bottom metal rings. Don't throw out the fabric just yet though. 


Use it as a template to layout your slides. I used 12 columns of 4 slides, so 4 rows and 48 slides in total.


I attached the columns of four slides together using jump rings, pliers and a metal hole punch. You can use any sort of small hole punch for this.


Next I used larger jump rings to attach the columns to the top metal hoop. I did this with the top part of the lamp shade on the lamp which made it much easier.

Once they are all attached, use jump rings to also connect them to the bottom metal hoop. After that I want in and connect the rows.


I didn't measure where to punch the holes, but you could. I guessed on one side then used that hole to determine where to punch one on the slide next to it, you want them to be right next to each other so they hang evenly. 


Once all of the slides are attached on all four sides, you're done!


This lamp shade looks especially good lit up. I'm going to pretend all of the families in the slides are related to me.

Let me know if you have any questions or if you decide to try this out!

Monday, October 22, 2012

Lace Doily Bowls

Friends, we've been busy. That's no excuse for letting the bigger projects fall to the bottom of our list (ahem, reupholstering the chair), but it's true. Chris with his multiple jobs and an upcoming art show, me with my shop, but I've been able to find time for smaller projects while Chris is working evenings.

This one is quick and easy, I've been wanting to try it for a while.

You will need: A crochet doily, fabric stiffener (or equal parts glue and water) and plastic wrap

You can find doilies at most fabric stores, or you can stop by an antique store. I used to see them at thrift stores all of the time before I decided I wanted to do make these bowls, then of course I stopped seeing them Funny how that happens. You best bet is to search for vintage ones though, because they are less expensive.

First you will need to find the right size bowl to mold your doily around, then cover it in plastic wrap.

Next you'll want to put your doily in a plastic bag and pour fabric stiffener in - enough to soak the doily.

Once it's been soaked in the fabric stiffener, place it on top of the bowl. Smooth out any wrinkles and let it sit overnight.


See how easy that was?

These bowls are a bit more decorative than useful, but I'm excited to pretty up some of my craft supply storage. I think these would be perfect for a table display - fill them with seasonal items such as pine cones. They would also be great as a fruit bowl. 

 What would you use lace bowls like this for? Have you been working on any small projects? Do share!


Tuesday, October 16, 2012

Mason Jar Organizer

As I think you can tell from past projects, I love distressed wood. We were also recently given six jars of apricot jam in mason jars. Thanks to some hungry roommates, three of them were emptied pretty quickly. I of course was holding onto the jars waiting for the right project. Then I saw this on Pinterest, the perfect project. 

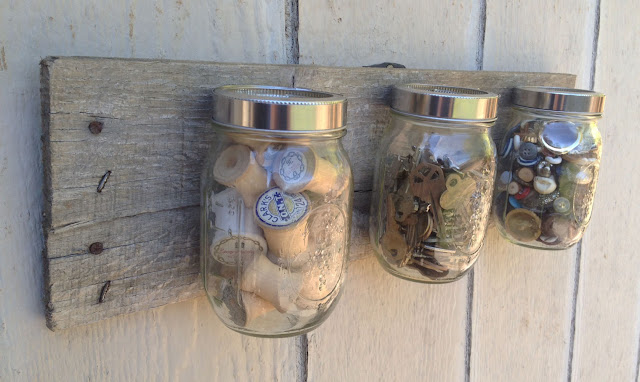
So, ideally, I will eventually turn this into an herb garden. Easily accessible fresh basil is a dream of mine. But I'm waiting on the other three jars and some tips on growing herbs from my mom. So for now, it will be a craft supply organizer, because you can never have enough places to store buttons if you're a crafter. 

Supplies: A piece of wood, mason jars, metal pipe clamps (found at any hardware store), a drill and three screws.


You'll first want to cut the piece of wood to size if it's not already. Ours is 19 inches long.

To be honest, I have no idea what Chris is doing in this picture, but the sparks looked awesome, so I kept it in the post.

When you have your piece of wood cut to size, lay out where you want your jars. Ours are about 2 or so inches apart.


Then you'll want to adjust the clamp so it fits tightly around the lip of the jar. We kept the metal rim part of the lid on the mason jars so they'll be able to screw off easily. You'll see what that looks like later. 

Before attaching the clamps, loosen them a bit so you'll be able to put the jar back in. Position the clamp so that the screw can go threw one of the cutouts rather than the solid metal, like in the picture above. 


When all of the clamps are attached, add the jars and tighten the clamps.


There you have it - a mason jar organizer. It's stylish and useful, which I love.


See how keeping the metal rim from the mason jar lid makes the jars easy to remove? This is great for quickly emptying and refilling the jars. 


How do you stay organized? Also, if you have any indoor gardening tips, please let me know and help me make my dream of fresh basil a reality! 

Sunday, October 14, 2012

Windowsill Display.

Most of this weekend was spent at Estate Sales...and just relaxing. Yeah, yeah, we'll get to finishing the chair eventually. 

But for now, little projects are more fun. 

So, there is a small antique store near us that is going out of business, so they are selling everything, for cheap! I came across these bottles for a quarter each and thought they would be the perfect way to decorate our windowsill. 

 All you need are glass bottles, fake flowers and scissors. You could use real flowers also, but we just don't have the time to maintain them right now and these faux flowers were on super sale at Jo-Ann Fabric Store.


Simply arrange the bottles as you please and cut single stems from the bouquet of faux flowers.


There you have a very pretty and very inexpensive way to decorate a window. It was hard to capture how pretty the light hitting the bottles is, but this was my best attempt.

We have another small project for you later this week. Stay tuned!

Sunday, October 7, 2012

Industrial Clothing Rack

Or, a mobile closet.


I have been living for the past few months with no closet, so all of my dresses, skirts & jackets have been crammed into a drawer. Having to iron things before putting them on has not been pleasant, so I pushed for this project to jump ahead in our queue of projects, luckily Chris agreed. 

I was inspired by this closet solution, so today we worked on making a simpler version.


This project cost us about $100 and took an hour or so to make.

You need: a piece of wood, galvanized pipes (two longer 5' pieces for the side and one shorter 3' piece for the top), the connecting corners for the pipes and the bases - all of these things are from Lowes (or major hardware store. You will also need wheels or some sort of feet for the closet, bolted screws and a drill.


First, cut your piece of wood to size and sand the edges.

Then we chose to stain our piece of wood. It would be awesome to use an old piece of distressed wood though, which you wouldn't need to stain. 


To prepare the pipes, use steel wool to get off any marks and polish the metal.


Chris used his drill to attach a wheel to each corner of the piece of wood. 

 After that, he flipped it over and placed the bases for the pipe. He used the top bar as a guideline for how far apart each base should be.


Once they were in the right spots he marked them, then drilled a hole where each bolt would need to go.

Ok, we're getting closer to a closet and moved the parts inside.


Connect the top bar to the sides using the elbow connectors.


And attach the sides to the bases. You'll need to hold the bolt with pliers and use the drill to screw the bolt in.


Now you have yourself a mobile closet! I, of course, rushed to try it out.


The nice thing about this too, is you have a great place to store your shoes.


And you may remember, this matches our curtain rod, so it fits in with the room decor nicely.

I just love how this turned out and am so happy to finally have a closet! It's the little things, right? How was your weekend? Work on any projects?

Wednesday, October 3, 2012

Embroidery Hoop Wall Art

As you know, Chris & I have three roommates. They live upstairs and we have the downstairs to ourselves. We set up our seating area and then Chris got his music area and I have a craft table. We've covered most of the walls with his collection of posters, but I wanted to do something more me in my craft corner of the room.

I have a huge box of vintage fabric that I love and have been wanting to use or display, so I decided that it would be perfect for the wall above my craft table, and what better frame than an embroidery hoop!

You will need: Fabric, an embroidery hoop ($1.20-ish at most craft stores), scissors and a glue gun

Lay out the fabric, face down, and put your embroidery hoop on top. If it's wrinkled, you may want to iron it first.

Cut a circle that is about an inch larger than the hoop.


Then, flip the hoop over so the fabric is right-side up and covering the inside hoop. Then push the outside part of the hoop over top. Tighten it until you the fabric is taut.


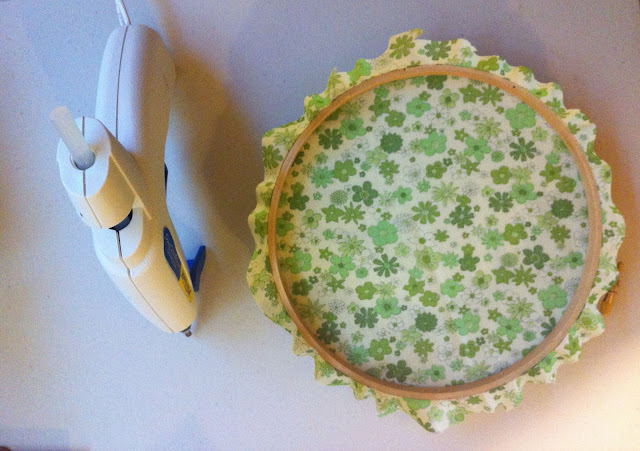
Once you are done with that, flip it back over and get your glue gun heated up. On the inside of the hoop, place a line of glue, about an inch at a time so it doesn't dry, then fold the fabric over the edge.


8

Then repeat!


I made four, but may add more to my corner. I also plan to frame some pages from a 1950's fashion magazine we found recently and I will continue dreaming of the day that I have my very own craft room. What have you done to personalize your space?