Tuesday, August 28, 2012

Industrial Pipe Curtain Rod

In my opinion, we were desperate for a curtain. Who likes waking up extra early because of a sunbeam hitting you in the face? No one. Unless you love mornings, I certainly do not (Chris finds this amusing and is quite chipper). When I moved out here I brought a single panel curtain I got at Urban Outfitters (similar to this) during my college years. It worked for a while because in a Philly row home, the windows are always tall and long, here however, the windows are short and wide.

So, the first part of this project was making the curtain work. I just folded it in half long ways and cut it in half to create two short curtains. Then I hemmed the bottom, which wasn't too much for my beginner sewing skills.

Something I never thought about before is how expensive curtain rods are. Seriously, unless you get a cheap plastic one, they are at least $30.

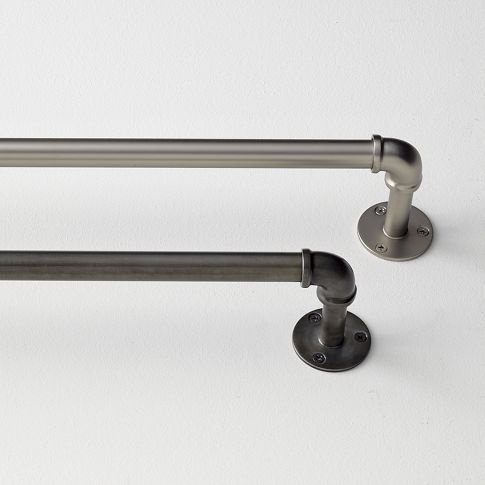
In the midst of my curtain rod search I came across these from West Elm on Pinterest. Chris definitely has a clean, industrial inspired style. I really like it when paired with natural wood. I'm not sure how it will all work with the vintage furniture I love, but for now, it works. Anyway, I knew he would like these, unfortunately they are over $60, which I cannot justify spending on a curtain rod. When I showed Chris the picture, he said, "I can make that." Words I love to hear!

The project was so easy, I probably could have even done it without Chris' help. All you need to do is head to a home improvement store and pick up the seven pieces shown below.


They happened to have a piece of pipe that was the perfect size for our window, but if they don't you might need to get it resized and threaded (most major home improvement stores offer this service for free).

Put together one corner, then add your curtain before adding the other. Then have someone help you hold the curtain rod in place and use a drill to attach it to the wall.


Easy, right? And less than $30. I love the look of this, so we are planning more projects that use piping! 

Sunday, August 26, 2012

Suitcase Side Table

So far the most fun part of this blog has been discovering each other's style. I love things inspired by nature, as you saw in the last post, and anything vintage. Chris likes, well, I'm not sure yet, but he is open-minded to mine. So this project was my idea. It's inspired by some old suitcases I found at an estate sale this weekend and the perfect fabric that I came across at a flea market. This project truly just fell into place - don't you love when that happens? 

Anyway, I came home Saturday morning after visiting all of the yard and estate sales in the area with the supplies, and Chris figured out how to make it work. 


First we used this odd little table, or desk, that we found at a thrift store for the legs and ended up using the top as a bookshelf that you'll see later in this post. So, you'll need table legs, either from an existing table or make your own using galvanized piping (you'll see another easy, awesome way to use piping in a post later this week). This table that we found was just about the right height, we just took about 3 inches off each leg using a pipe cutter. 


Chris removed the legs while I got started covering the suitcase. 


I cut the appropriate size of fabric and then Chris took over. We didn't use any glue, we just used a flat head screwdriver to push the fabric into the lip on the suitcase. If we ever wanted to change the fabric, it would be very easy to do. 


Once the top of the suitcase was covered, we (by we, I mean Chris) got started attaching the legs. He pre-drilled holes in both the suitcase and a piece of wood which he used to provide better support.  


You'll want your wood support vertical rather than horizontal so both sides of your table leg are supported, you could also use a larger piece of wood that covers the whole inside of the suitcase. 


Each leg had two holes on each side. Chris first attached the outer most side, because on the inside he used another piece of wood to make the legs slanted outward. 


Once the legs are secured, you're finished! And now you have a unique side table, or coffee table, or whatever you'd like to use it as! 


And here are some pictures of our seating area, which of course is still a work in progress. But I'm glad to have a place to sit, rather than just a large empty room. We used the top of the table as somewhat of a bookshelf. It's not permanent, but definitely a good fix for the moment. Here's to finally getting somewhere! 

Sunday, August 19, 2012

Tree Branch Votive Holders

I've always been really into home decor that's inspired by nature. Bringing the outdoors in, you know? Since moving to a city like Denver that is surrounded by mountains, I'm even more in love with things inspired by nature. It really fits Chris' style as well. 

There have been tree branch candle holders all over Pinterest and we had an excess of fallen tree branches in our backyard, so of course we need to make some. With the right tools (and skills) it was easy. 


First, you need a branch. Choose one that is pretty thick, this one was about three inches in diameter. 


Once you've selected your branch, use a saw to cut three pieces, each a bit higher than the other. We cut these three sizes - 1.5", 2.25" and 3"  


Sand the top of each piece so that it's smooth. 


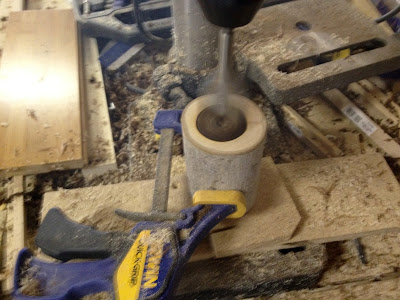
Then using a drill press with an inch and a half in diameter bit, we drilled the hole in the top. Chris used a clamp to hold the base of the branch in place while he created the hole. 


The last step is to get small tea light candles, you can get a big pack of these for less than $3 at Target. 


And there you have it! Tree branch candle holders from our own backyard, with a little bit of labor of course. 

First things first.


Hi! We're Chris & Liz, well, I'm Liz. I'll be doing most of the writing here while Chris does all of the manly, building stuff. We both recently moved from our hometowns near Philadelphia on the East Coast to beautiful Denver, Colorado. It's been a long journey to get here and we are finally starting to settle into a home that we currently share with three roommates and a very lovable dog. 

Chris is a talented handyman and can make just about anything it seems. I'm the crafty one, I make jewelry and am a pro with a glue gun, but certainly cannot use a drill. 

We're twenty-somethings who are trying to create a home on a little budget. Both of us are constantly coming up with ideas, so we thought it would be fun to document them! We're indeed on an adventure and we'd love for you to follow along as we share our DIY projects.