Sunday, January 6, 2013

New year, new space.

Hello, hello! Yes, we are still alive! We spent Christmas and the week after back home on the East Coast and then this past week has been spent catching up on everything. The handmade gifts were a big hit! Especially the ornaments

When we got back to our little home in Colorado we decided to clean, organize and simplify to start of the new year. We also splurged on a TV! 


The black book/record shelf is from iKea and the coffee table (which we have big plans for) was thrifted.


We decorated the empty shelves with colored glass vases (also thrifted) and copper plated pieces. I am very into copper right now and would love to buy these but instead we found vintage goblet glasses like these at the thrift store for our future kitchen. 


We've converted our suitcase side table to a record player stand since we now have a coffee table and added a reading lamp from iKea. 

The other half of our living space is still a bit messy, but at least we have a nice sitting area now. 

How was your holiday? 

Wednesday, December 19, 2012

Gift Idea: Soap Dispenser From A Liquor Bottle

Gifts for guys is difficult - at least for me. I'm horrible at shopping for guys. We needed a fun gift for the guys on our list and came up with this - a soap dispenser from their favorite liquor bottle. This sort of thing would be perfect for a twenty-something guy living on their own or a guy's 'man cave.'
 
You can also use the same concept with a decorative bottele if you aren't into the idea of a liqour bottle.
 
You need: A soap dispenser pump (we got this from a old bottle of lotion, but I'm sure they sell just the dispenser somewhere) and a small empty bottle of your favorite liquor.
 

First, drink the liquor! Chris helped with that.

To find the right size soap dispenser pump, carry around the lid to your bottle to compare (you'll get less judgy looks than if you were to carry around the whole empty bottle). Luckily we had lotion that had the perfect size pump. I hated the color though, so I spray painted it black.


Then I just took off the plastic rim of the bottle, cleaned out the inside and poured in some soap. It's not my style, but I am pretty pleased with how it turned out!


What do you think, would this gift work for somone on your list?

Tuesday, December 18, 2012

Bathroom Re-do

...kind of.

My least favorite room in our current home is the bathroom, well, it was the bathroom. When renting, there aren't many things you can do to fix a room, but we made one small adjustment and now I don't mind it as much.

W added a ton of storage with this amazing cart from IKEA. It was $49.95, but worth it in my opinion, because we will get so much use out of it. The color and style are perfect and it's been keeping the sink area from getting cluttered.

 
Now for some more pictures of our bathroom. Everything (sink, toilet andis from Target, IKEA, thrifted or repurposed. 


Definitely not my dream bathroom, but it will do for now. 

Monday, December 17, 2012

Gift Idea: Hand Painted Mug

Chris & I were in Starbucks yesterday and saw this two-tone, gold and white mug while we were waiting for our fancy coffee drinks. I needed to re-create it.

Mugs are a great holiday gift - you can put hot chocolate mix, tea or coffee inside to make the gift more fun and festive. Also, you can never have too many mugs. Well, you can, but it takes a while to reach that point.

Here's the inspiration...

+

Another idea is to try out patterns, like polka dots! Or stipes! I went with a two-toned look like the original inspiration but am thinking of heading to the thrift store after work to find more white mugs to paint polka dots on. Aren't these adorable?

 +

I love this idea too, which you'd use a similar technique for. I'm actually raid the thrift stores home goods section and paint everything gold!

+

You will need: white mugs (we got them from IKEA for $2.99 each, but you can also try a thrift store), enamel paint and masking tape.


Use maksing tape to create a curved line at the middle of the mug. I then used an exacto knife to touch it up.


Then, paint! It took several coats, but they dried fast. I removed the tape carefully and reused the same piece for the second mug so that they would look the same. Also, the line was not perfect from the tape in some areas so I went through and touched it up after.

So the paint doesn't come off after you wash your mugs, bake it for 10 minutes at 325 degrees. You can also just let it sit for 20 or so days before using.


I love this set of mugs so much! And each was less than $5, rather than the $9.95 each that Starbucks was charging. Since I have so much paint left over, I will be making more tonight. This time, like I said earlier in this post, polka dots!

Happy Monday, friends!


Thursday, December 13, 2012

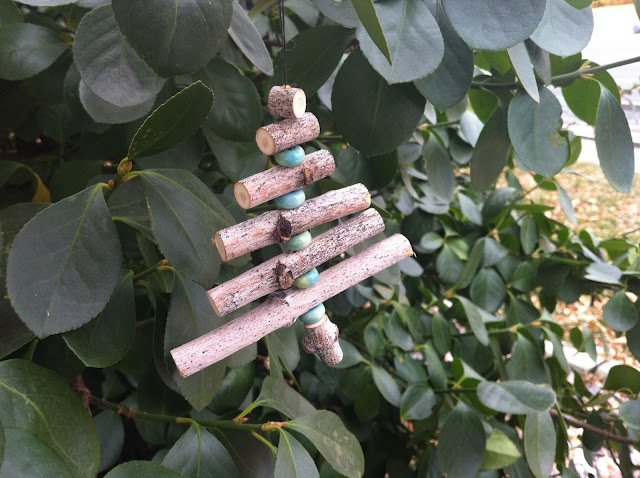
Gift Idea: Tree Branch Ornament

Ornaments are such a nice, meaningful gift to give during the holidays, so we really wanted to make some.

As you know from some of our past projects, we love using elements from nature. So as we were brainstorming a special ornament to make for our families, this seemed perfect. Inexpensive, easy, customizable and very much our style. 

You will need: A tree branch, a drill, a knife or saw, five beads, thread and a needle. 


First, cut your pieces to size. You'll want to start with the longest one at the bottom and make the pieces progressively smaller. We cut 5 for the tree including a small one for the top and a vertical pice for the trunk. 


Then using pliers and a drill, put a hole in the center of each piece of branch.


For the piece for the trunk, you need to drill through vertically (see the image below).


Finally the fun part. Choose the beads you'd like to use and lay out your branch pieces. We plan to use different beads for each ornament we make.


Last simply thread them together and create a loop at the top.


I'm going to make it a tradition to hand-make an ornament each year. How about you? Do you collect ornaments for your tree or give them as gifts?

Monday, December 10, 2012

Gift Idea: Teacup Candles

Candles are a great gift - they are something just about everyone enjoys but don't often buy for themselves. Pretty much the point of a gift, getting someone something they want but won't buy, am I right? Like I said, candles are a great gift. 

We plan to give them to all of the older ladies in our families. We also decided to make them ourselves using teacups found in thrift stores. I love teacups and even have a whole Pinterest board dedicated to them, so searching for the perfect ones was fun. 

You will need: Partially used candles or wax, a candy thermometer, a teacup, wicks and a glue gun 


You can do a few different things - use old candles, use unscented wax and add the scent yourself, buy these wick-less scented wax cubes. Chris & I actually picked out the scents together we smelled them all and discovered that I love classic evergreen scents while he likes sweet scents such as sugar cookie. 


Whatever type of wax or scent you choose, place it in a pot. Don't use your best pot, because melting wax can get messy. Keep the thermometer in the pot and make sure the wax doesn't heat up over 185 degrees. I kept my stove top on medium and the wax around 150 degrees.


Next you'll want to use a bit of hot glue to attach the wick to the bottom of the teacup. Before you do, make sure the cup is completely cleaned and dried. 


I attempted to make a mason jar candle s well, but ran out of wax. When I make more I'll try again. 


When all of the pieces of wax are melted, pour it into the teacups. If you spill any wax on the edge, clean it up before the wax dries. 


Let the wax dry, then trim the wick.


Each candle cost about $4. They are unique and a cute decoration for any home. This is a gift that is sure to get some use.

Gift Idea: Hand Stamped Scarf

This year Chris and I decided that every gift we give will be handmade by us. My list of people to get gifts for is small - my mom, my dad and my brother, while Chris' is a bit more extensive. His family is close and he has quite a few cousins that he gets something for each year. We don't have a lot of time or money, but we'd rather have some late nights than credit card debt, so we began our quest to have a handmade Christmas.

The first project turned out to be my favorite - hand stamped scarves for all of the ladies. I love to recieve scarves as gifts, especially in the middle of winter! To get a unique one is expensive though - these ended up being about $6-7 each and I made three different patterns.

Geometric print - This is for a young, trendy gal in collage. Geometric prints are in (according to the Internet) and I think she'll love it!

You'll need: A solid color scarf, fabric paint and a piece of foam (found at any craft store)

First just cut your shapes, I did a few different sized triangles.


The scarf I stamped is light blue and I used gold fabric paint. Then I just stamped alternating rows of triangles. Your pattern doesn't need to be perfect because the scarf will be worn scrunched up.


I used a paint brush to make the stamping process a bit less messy.


Then, since the triangle shapes were small and easy to work with, I just used the foam rather than mounting it on something.


This scarf was the most time consuming of the three because the stamp was sp small. I love how it turned out though!


Horse Print: This is for an animal lover! I decided to replicate my very favorite vintage scarf. You will need: A scarf, fabric paint, an exacto knife and foam
Chris helped me make the stamp for this. He took a picture of it on his phone then blew up the image and printed it.


After that he cut out one of the horses, traced it, then cut it out with an exacto knife.


Because this stamp was bigger and more intricate, he mounted the foam piece on a thicker piece of foam board.


To make the stamp even easier to use, we glued an old spool on the back to create a handle. 


Again, I used a paint brush to reduce the mess. Also note, if you're doing this project on a nice table, put something like a paper bag under the scarf so the paint doesn't bleed through onto the table. I was working on my craft table, so I wasn't concerned.

This scarf turned out so well I'm going to make a few more!


Apple Print: This is for a new teacher! I wanted to experiment with using a fruit or vegetable as a stamp.

You will need: Fabric paint, a scarf and an apple.

Just cut an apple in half, eat one half and use the other as a stamp! I wanted to use a real piece of fruit for the texture.

This was the easiest scarf to make and I think it turned out the best.

 
Here's a look at them on! 


We went craft crazy over the weekend, so stay tuned for more easy gift ideas. Let us know if you are having a handmade holiday and what projects you're working on!